
Lightsaber Hilt Surface Manufacturing Processes
Surface treatment is not just about color; it dictates the tactile feel, durability, and assembly precision of the hilt. We categorize our processes into five technical stages.
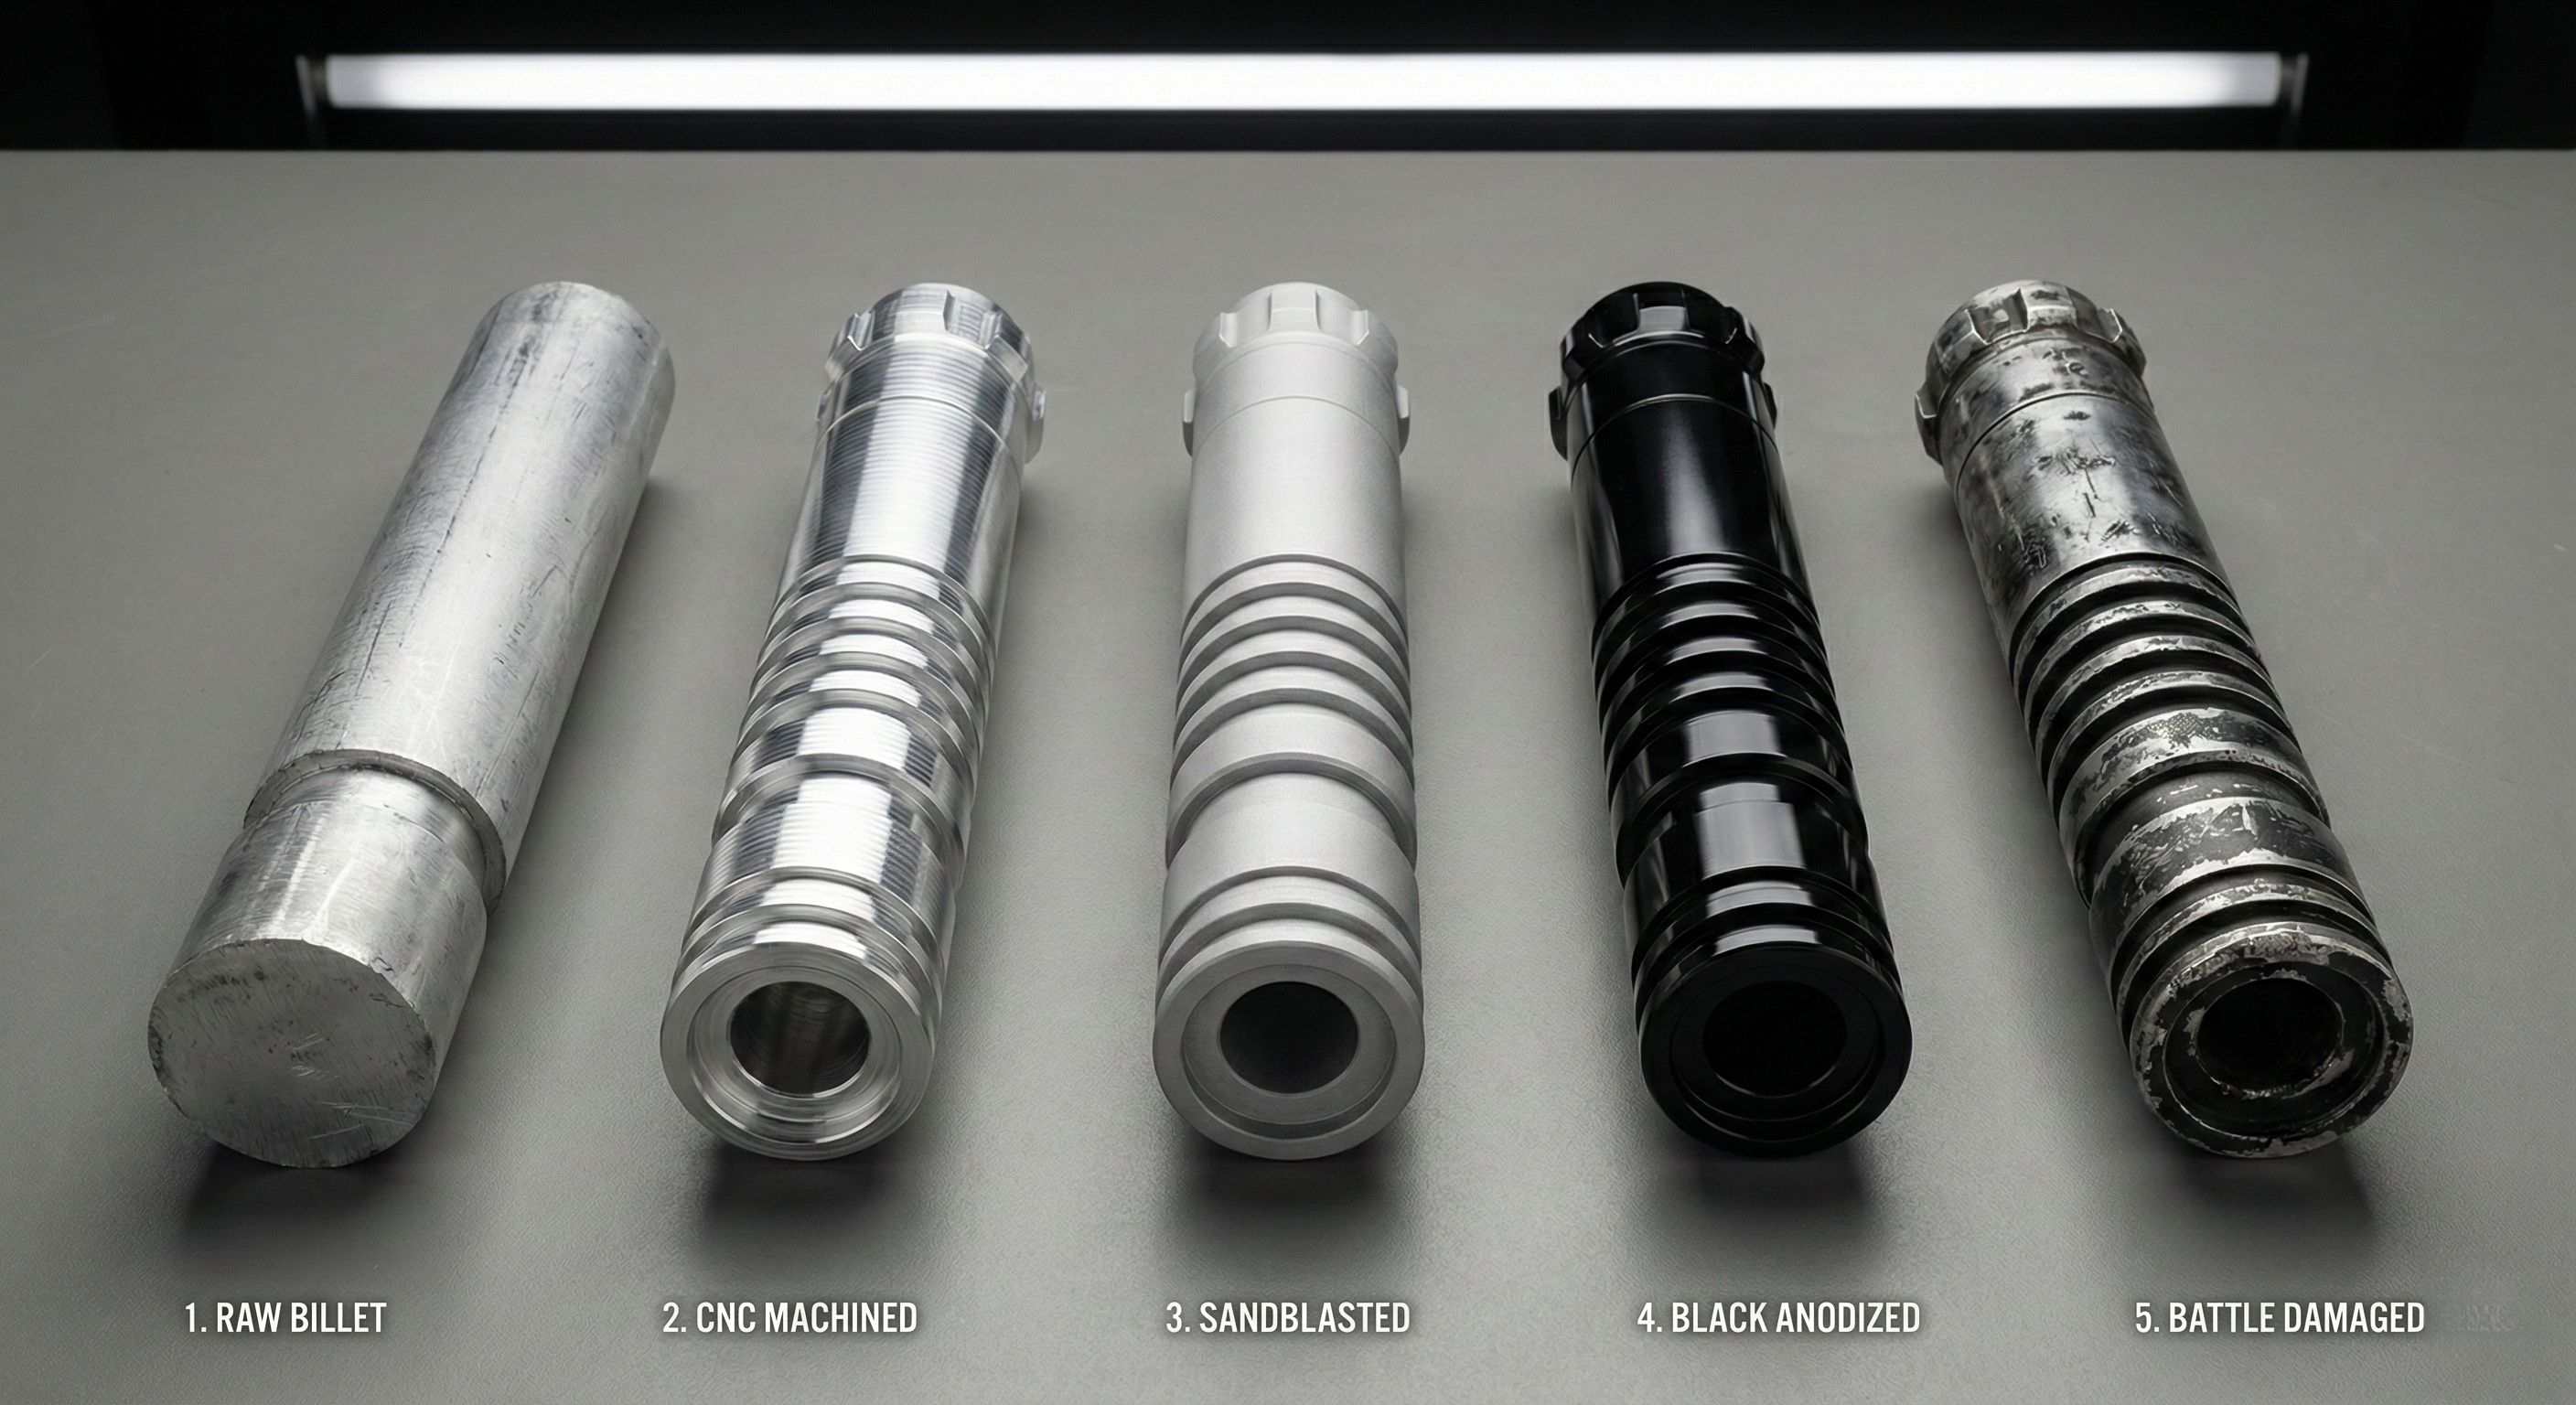
1. Mechanical Texturing
The first step after CNC machining. Defining the metal's physical character.
1.1CNC Turning —— The "Skeleton & Skin"
The workpiece rotates at high speed (2000+ RPM) while a stationary tool shaves off material.
What it creates:
Profiling
Turning the raw thick bar into the elegant curves, choke points (thin necks), and emitter shapes. This defines the Ergonomics of the hilt.
Precision Threading —— Critical for Quality
Cutting the male and female threads that allow the Pommel and Body to screw together.
High-End Indicator: Smooth threads that screw in silently without "gritty" friction sounds.
Knurling—— Tactile Grip
Pressing a patterned roller into the spinning metal to create a textured grip.
Types: Diamond Knurl (aggressive grip), Straight Knurl (classic look).
Function: Prevents the saber from flying out of your hand during dueling.
Heat Sink Grooving
Cutting deep, parallel rings (usually near the emitter).
Function: Increases surface area to dissipate heat from high-power LEDs, while paying homage to the classic Luke Skywalker "Thin Neck" aesthetic.
Polishing
Cost Logic: Dependent entirely on the target Ra (Roughness Average).
High Gloss = High Cost: Achieving a mirror finish requires multi-stage buffing. Any flaw is visible, leading to a high rejection rate.
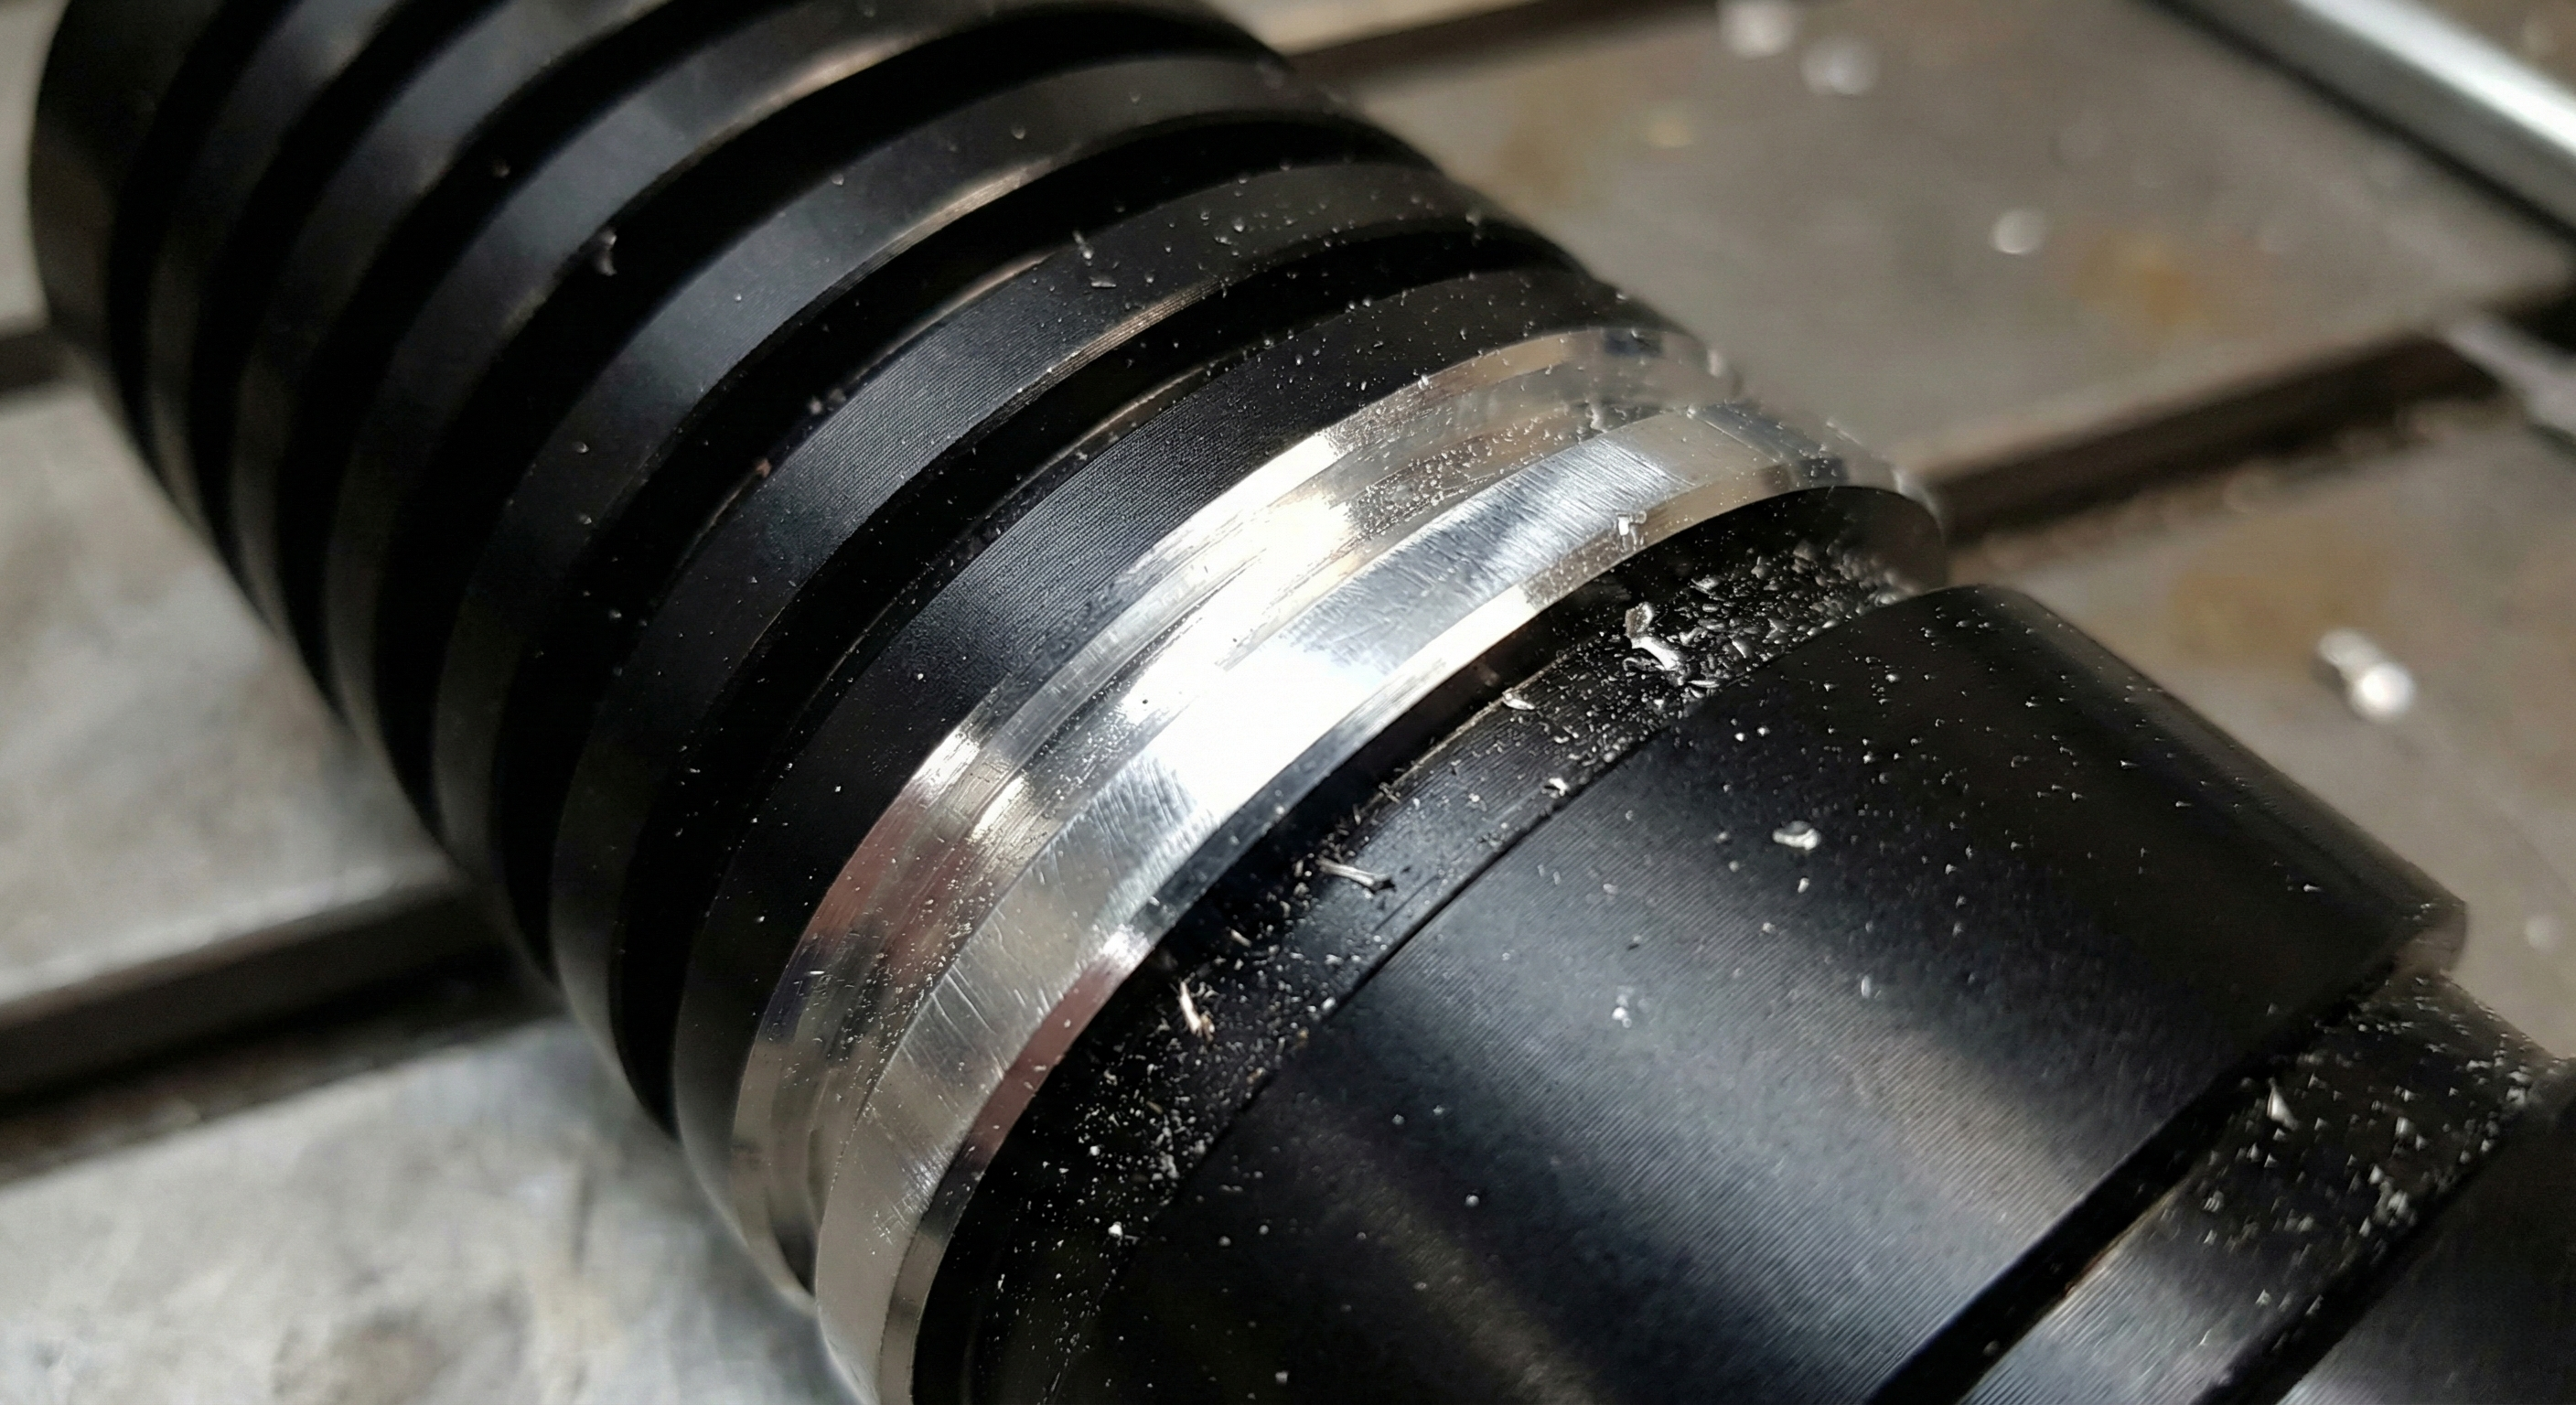
"Diamond Cutting" / High-Light Chamfering
Process: After the hilt is Anodized (Black), it is put back on the lathe. A diamond tool cuts the very edge of the rings.
Effect: It reveals the raw, shiny silver aluminum underneath the black color. This creates a striking "Silver Ring" contrast effect.
1.2.CNC Milling—— The "Features & Detail"
The hilt is locked in place, and a high-speed rotating drill/cutter moves around it to carve shapes.
What it creates
Drilling & Boring
Switch Hole: Creating the precise 12mm or 16mm hole for the activation button. It must be perfectly round.
Charging Port: Milling the oval slot for the Type-C USB port.
Set Screw Holes: Tiny holes for the screws that hold the blade in place.
Pocketing
Creating a flat recessed area (Pocket) so the button or control box sits flush with the hilt surface, rather than sticking out.
Benefit: Makes the saber more comfortable to hold (no buttons digging into your hand).
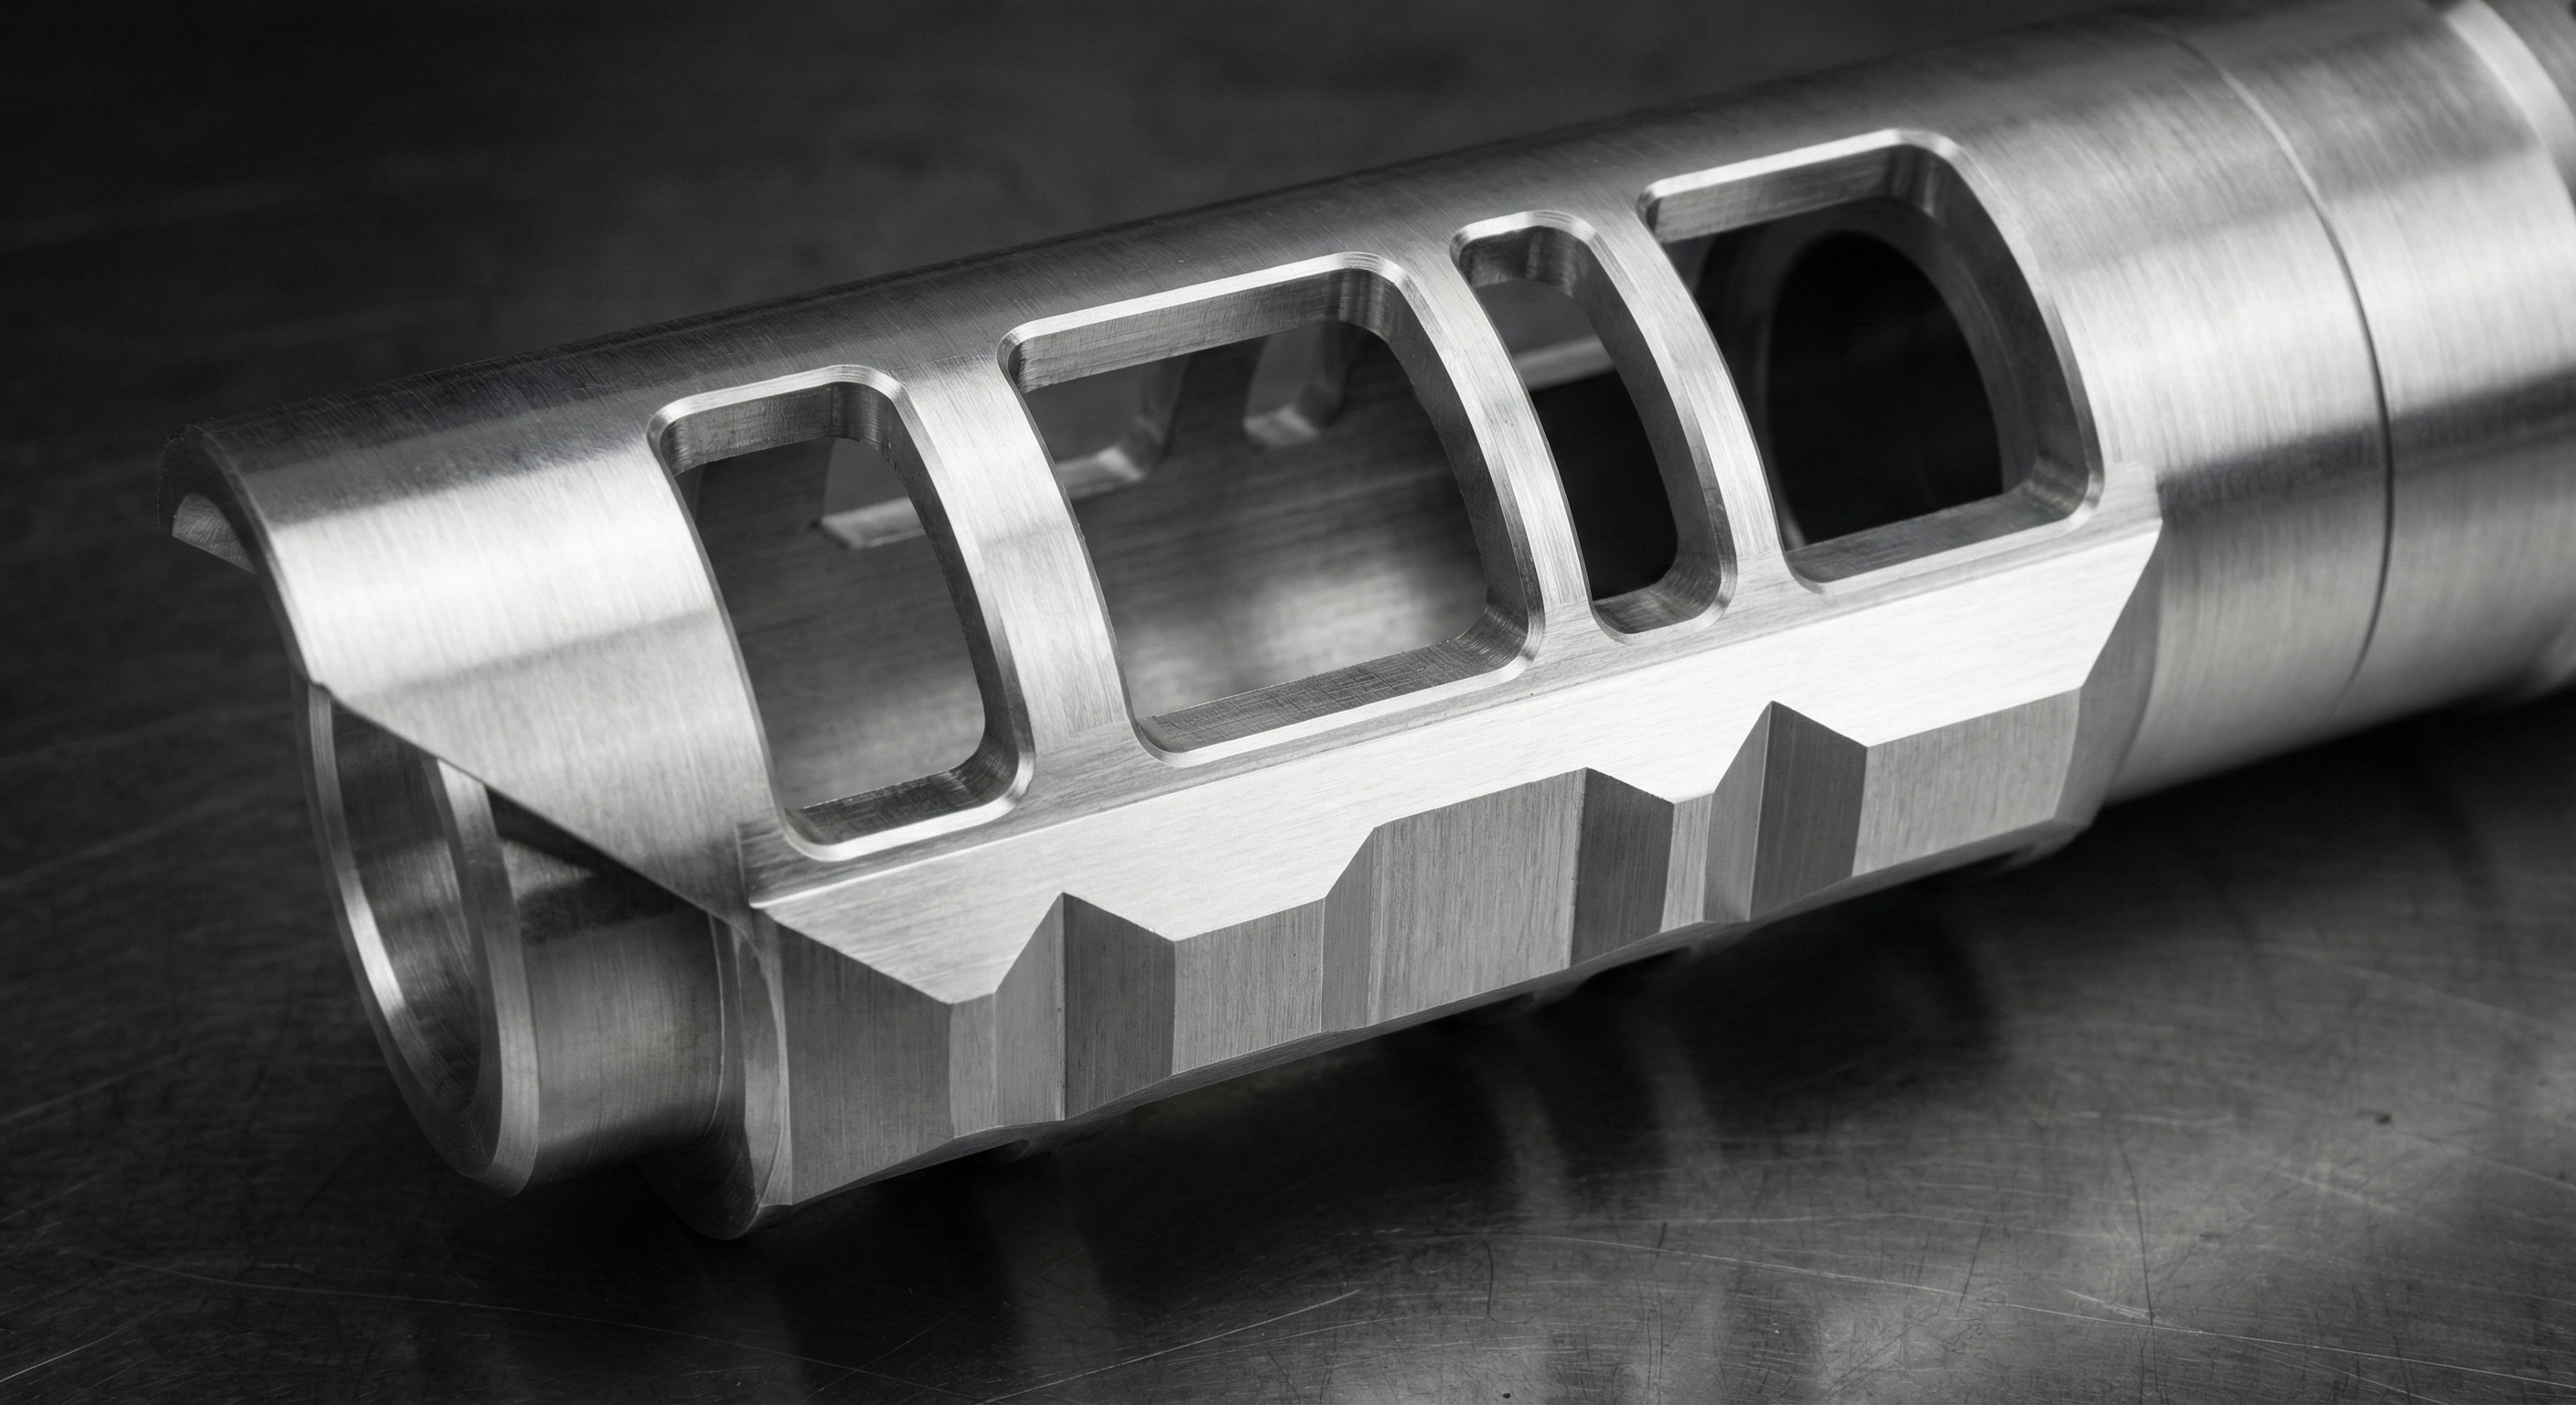
Windows / Skeletonizing
Cutting slots in the Emitter section.
Function: Allows the light from the blade to shine through the side of the metal ("Shine-through effect"). Essential for designs like the Starkiller or Kylo Ren styles.
Geometric Surfacing
Shaving the sides of a round tube to make it Square, Hexagonal, or Octagonal.
Aesthetic: Transforms a simple tube into a complex, Sci-Fi geometric weapon.
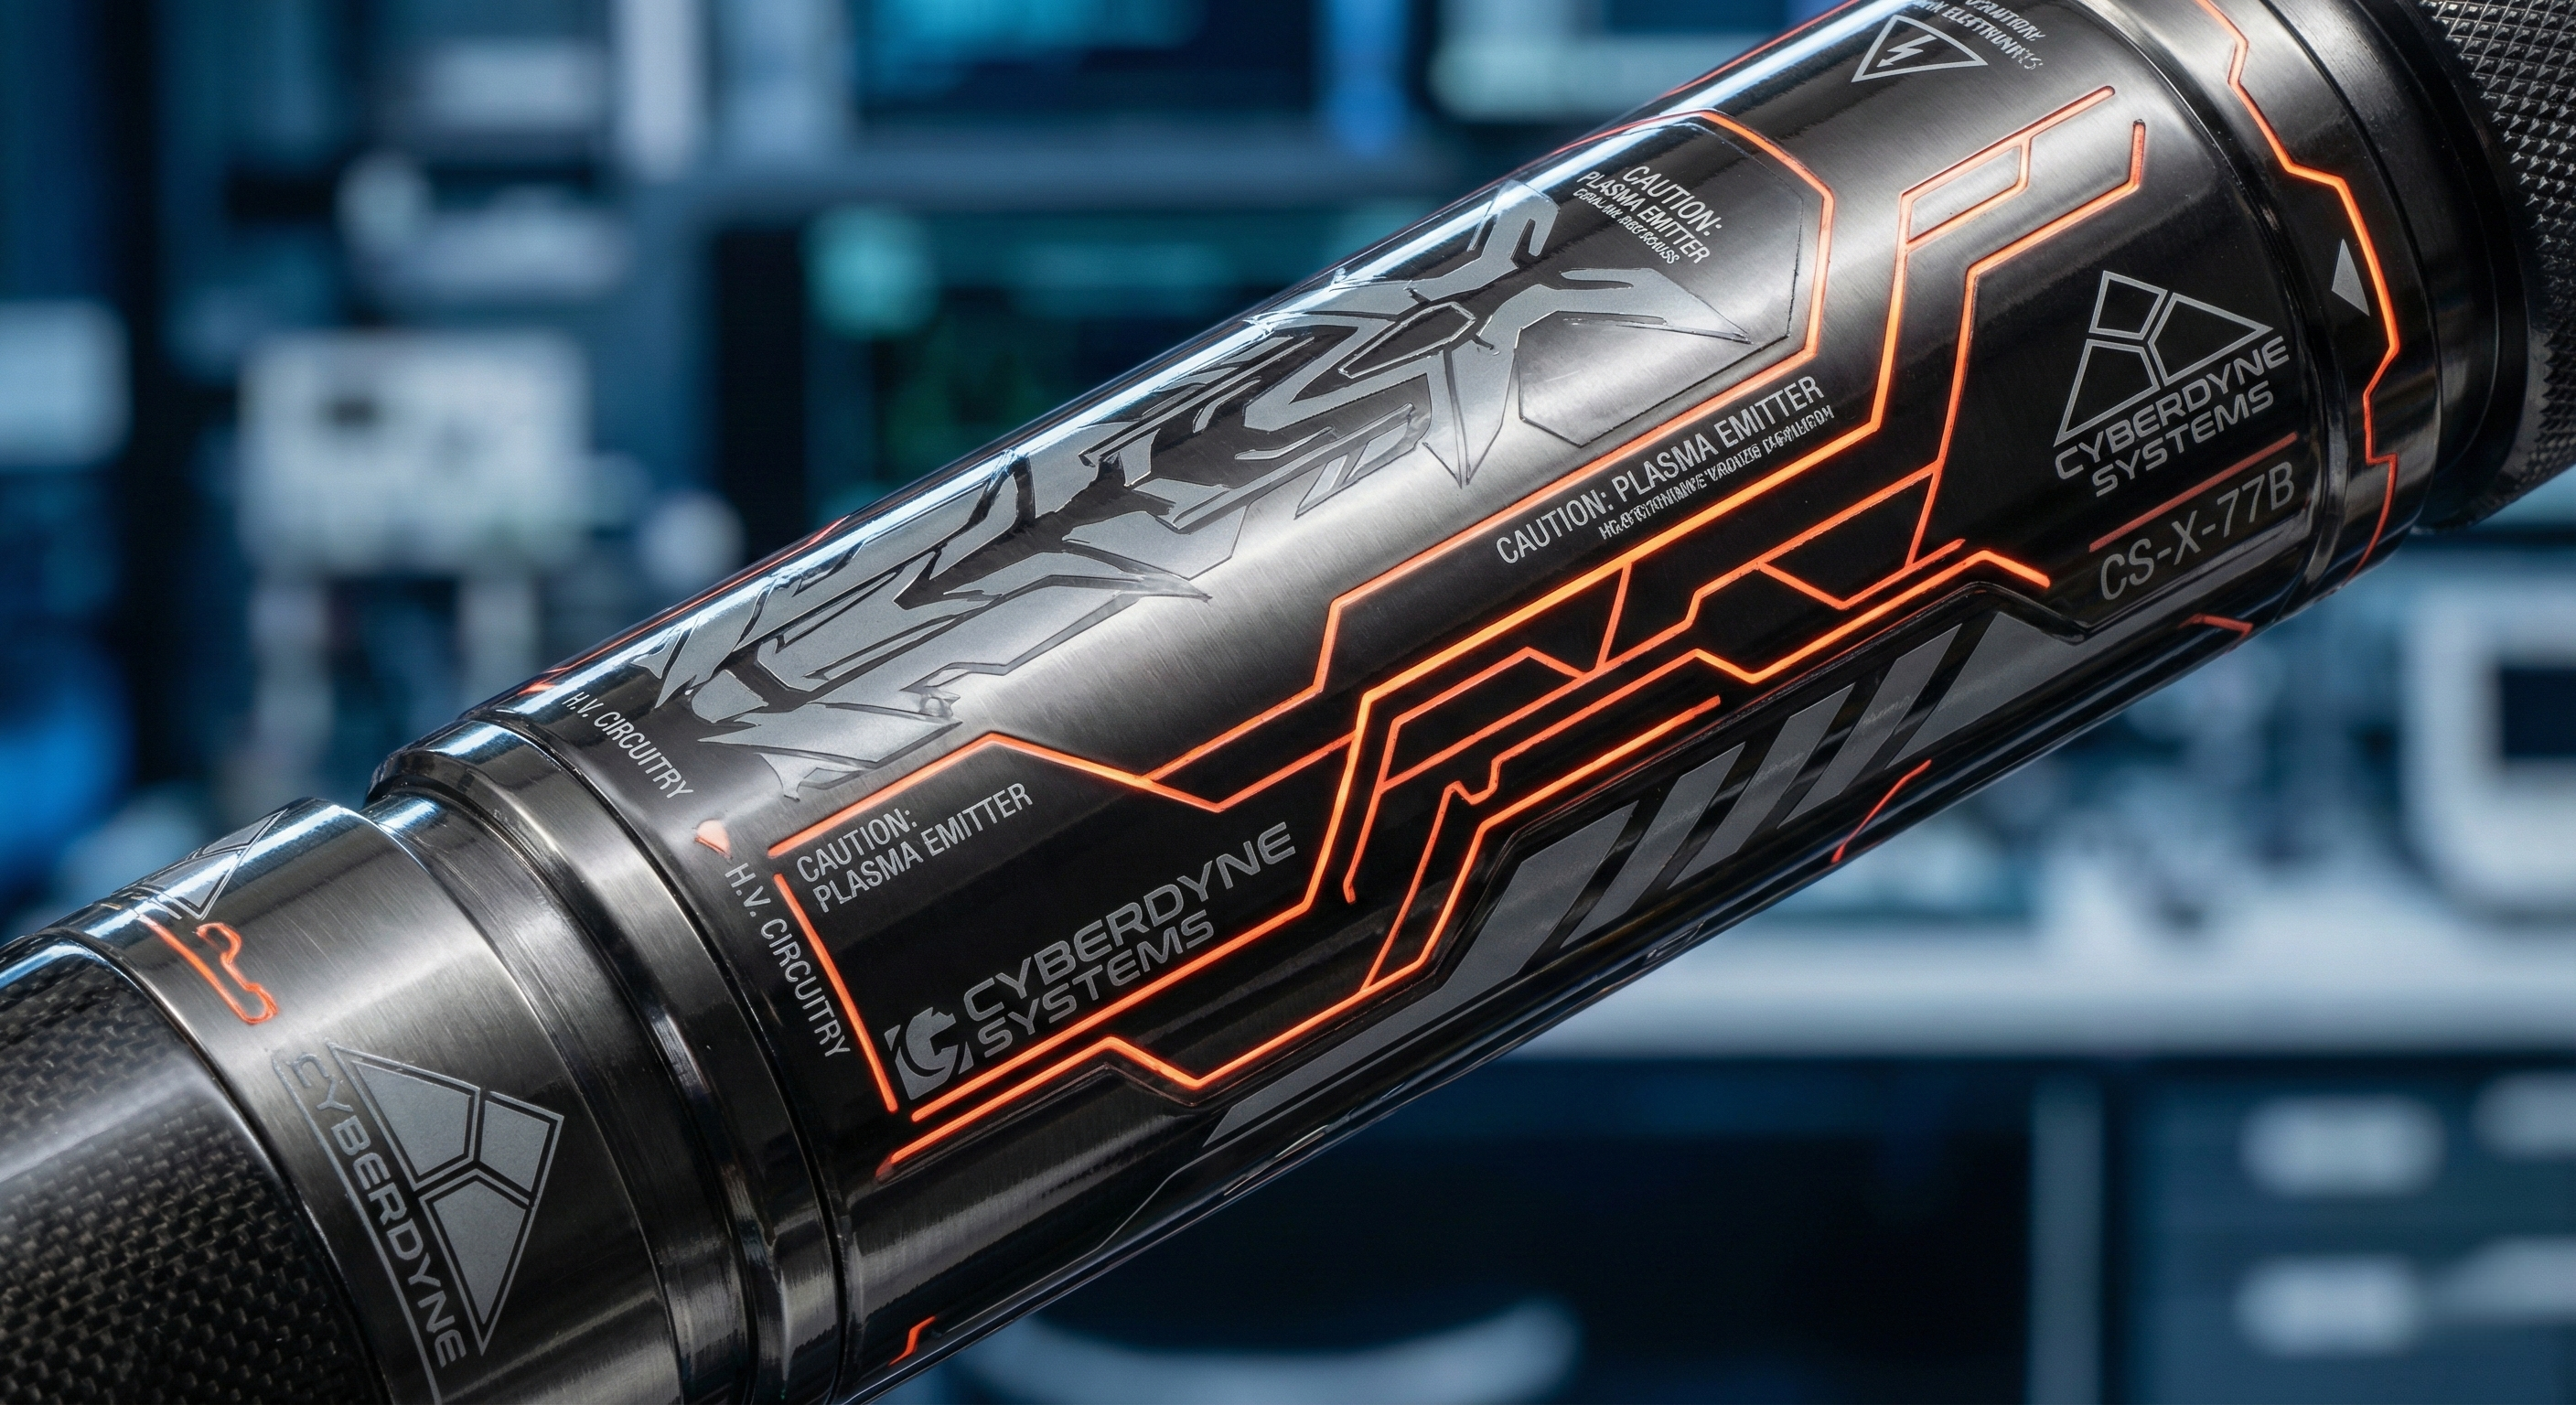
Engraving
Using a tiny milling bit to carve deep logos, faction symbols (Jedi/Sith crests), or circuit board patterns (Reveal core style) directly into the metal.
Difference from Laser: Milled engraving has depth (3D feel), whereas laser is just surface burning.
2.Molding & Casting: The Mass Production Powerhouse
When a design is too complex for CNC, or the quantity is huge (1000+ units), can switch from machining to Molding. This involves creating a master mold and filling it with molten metal.
2.1. Zinc Alloy Die Casting
The "Heavy Metal" for Complex Details.
The Process (High-Pressure Die Casting - HPDC): We make a steel mold. Then, we inject liquid Zinc Alloy (Zamak) into it at high pressure. It cools and solidifies in seconds.
Why we use it
Complex Shapes: Perfect for parts with weird curves,or intricate control boxes that CNC would take hours to carve.
Weight: Zinc is heavy (density 6.7g/cm³). It makes cheap hilts feel "premium" and substantial.
Cost: Once the mold is paid for, the unit price is incredibly low.
The Downside
"Pot Metal" Risk: Zinc is brittle. If dropped on concrete, a thin zinc part might snap.
Plating Issues: If the casting has air bubbles (porosity), the electroplating will have "pits" (small dots).
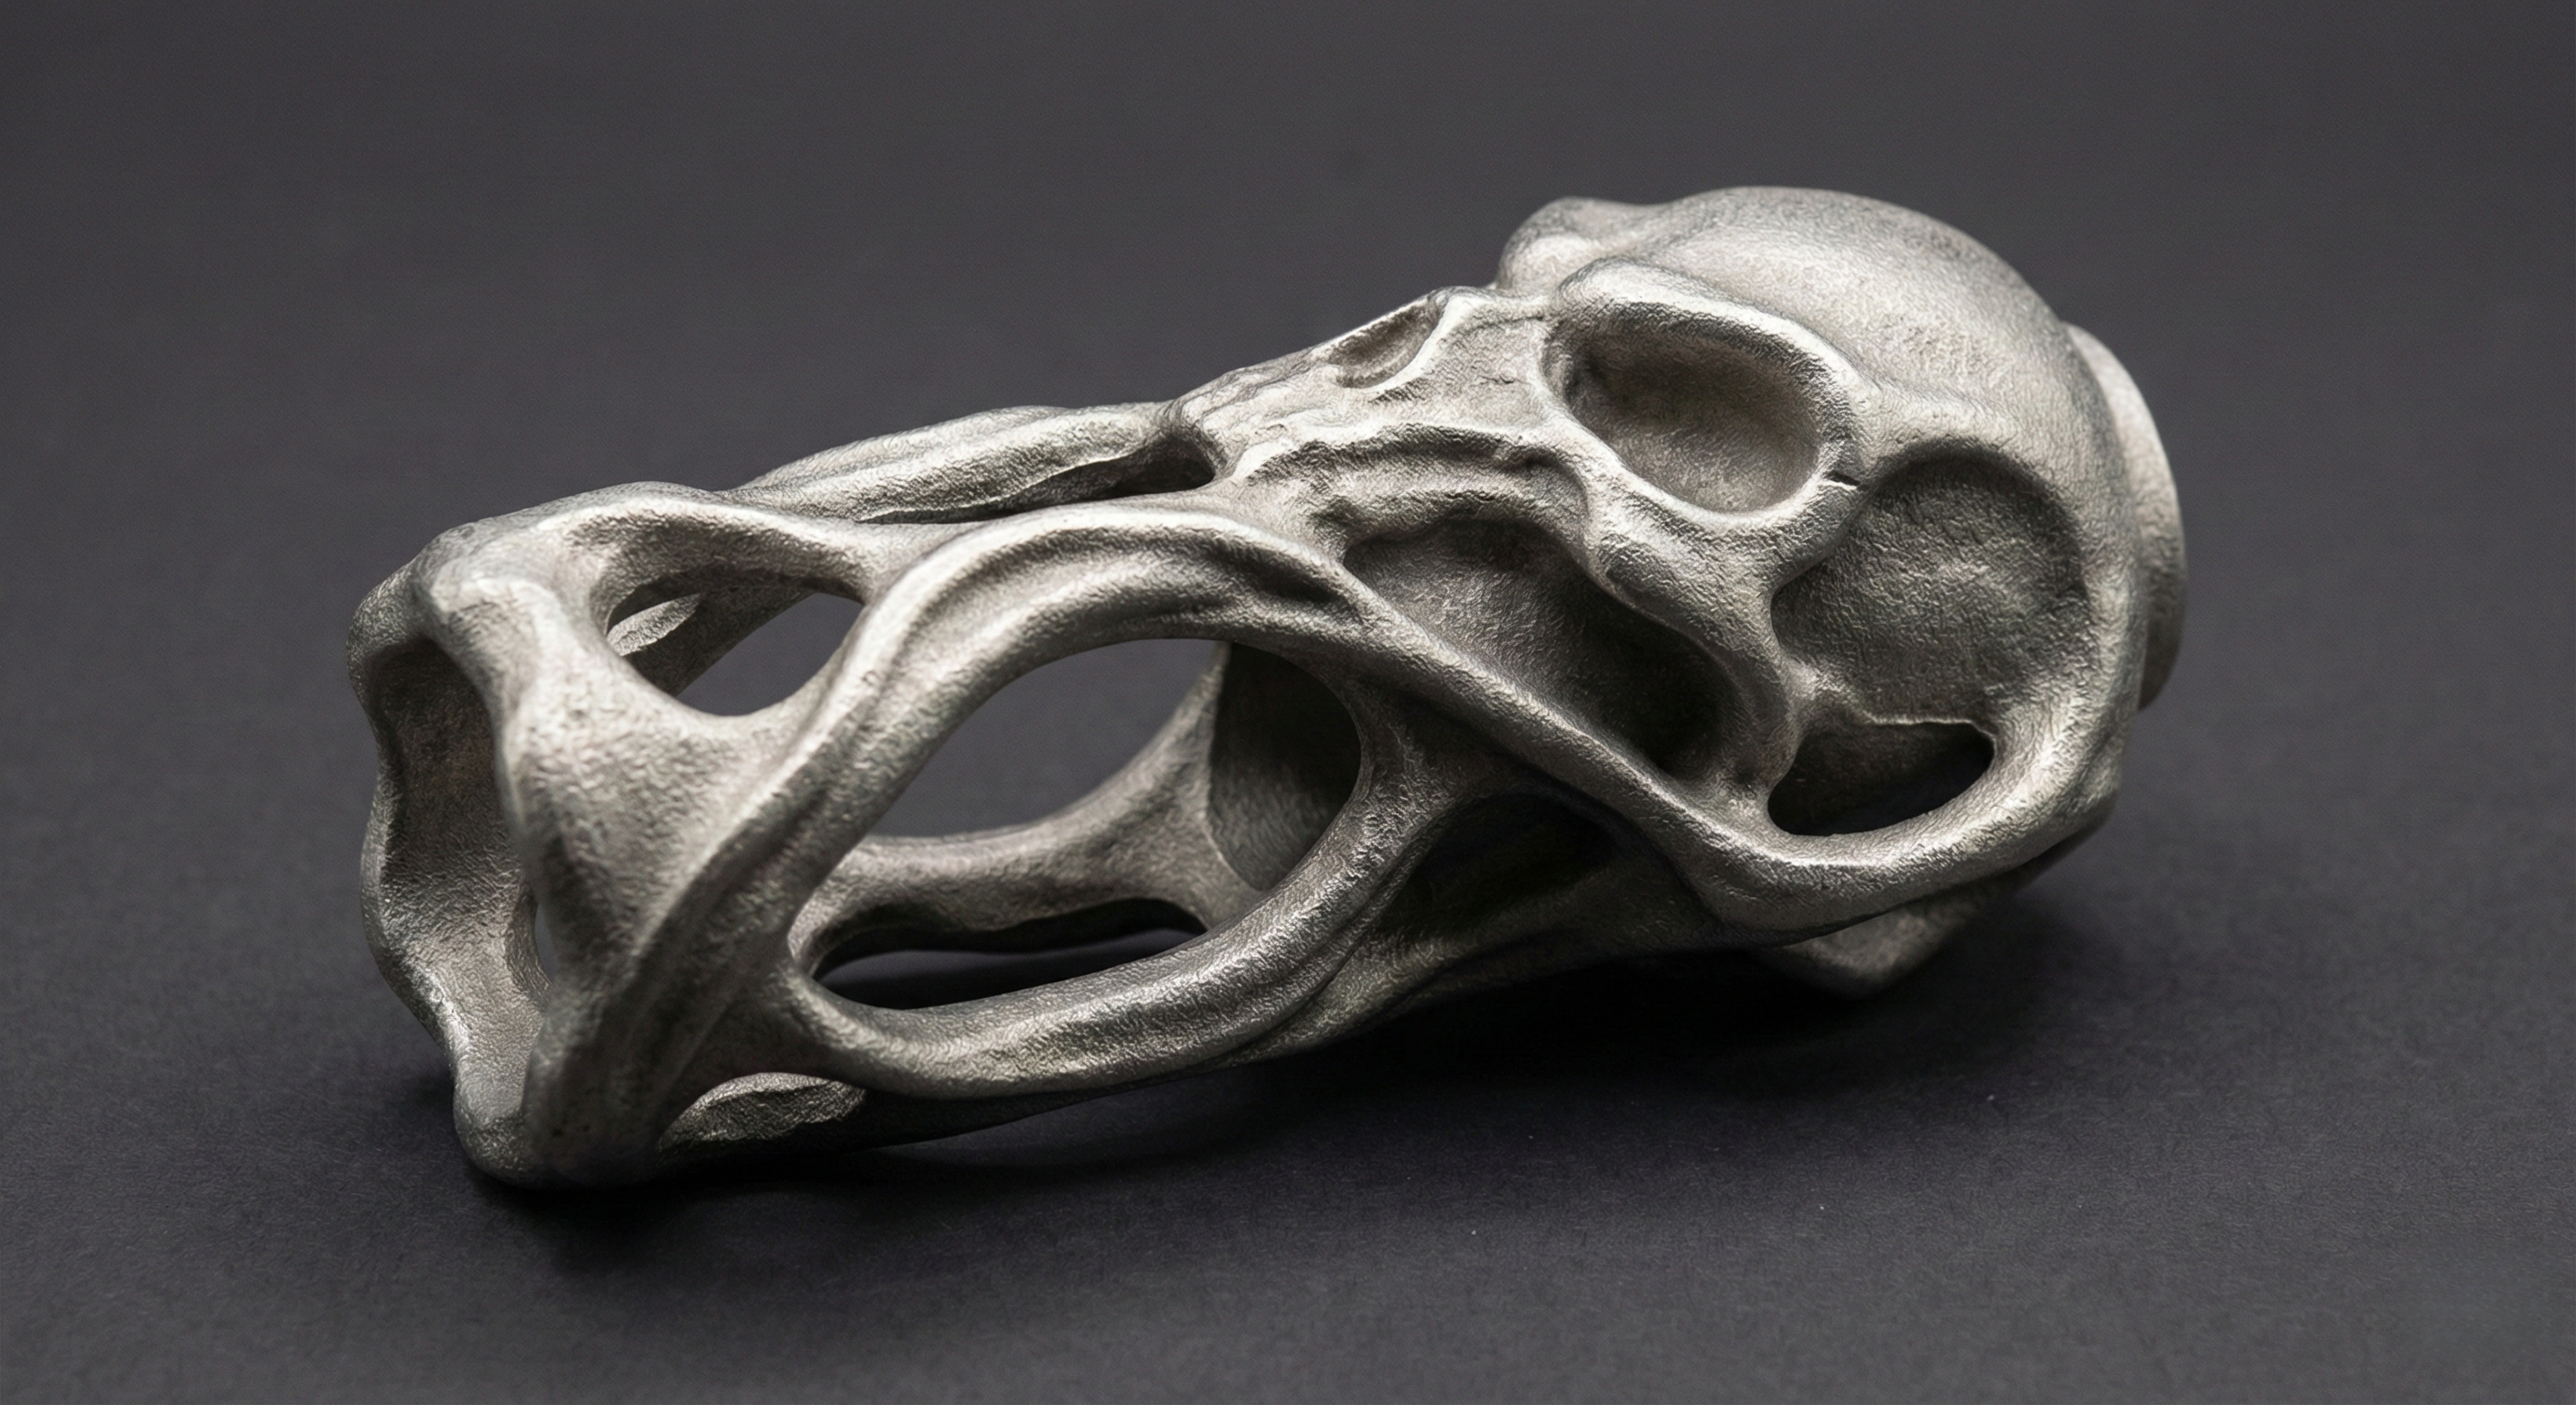
2.2.Steel Investment Casting
Also known as "Lost Wax Casting" .
Correction for B2B: People rarely use "Die Casting" for steel because steel melts at 1500°C (too hot for normal molds). Instead, they use "Precision Casting".
The Process:
Make a Wax Model (inject wax into a mold).
Coat the wax in ceramic sand to make a shell.
Melt the wax out ("Lost Wax").
Pour molten Carbon Steel or Stainless Steel into the ceramic shell.
Why we use it
Impossible Geometries: For parts like Dragon Heads, Skulls, or Organic Curves on a hilt pommel. CNC cannot cut "undercuts" or biological shapes; Casting can.
Material Strength: Unlike Zinc, Cast Steel is incredibly strong and weldable.
Application in Lightsabers:
Crossguards: Like the jagged side vents on a Kylo Ren saber.
Internal Chassis Skeletons: For high-end "Master Chassis" designs made of metal.
2.3. MIM (Metal Injection Molding)
The High-Tech "Casting".
Concept: Mixing metal powder with plastic binder, injecting it like plastic, then baking out the plastic to leave solid metal.
Use: Tiny, super-precise steel parts like Switch Buttons, Retention Screws, or Latch Mechanisms.
3.Sandblasting / Bead Blasting
Process: Shooting media at the aluminum to remove CNC tool marks.
Grade Logic
Coarse Sand: Cost-effective, industrial look, hides scratches well.
Fine Glass Beads: Premium Finish. Creates a silky, satin-like texture (Apple-style). More expensive due to slower processing time and media cost.
4.Brushing
Function: Creating directional grain lines.
Benefit: Excellent for hiding future usage scratches. Unlike polished surfaces, a new scratch blends into the brushed texture.
5.Polishing
Cost Logic: Dependent entirely on the target Ra (Roughness Average).
High Gloss = High Cost: Achieving a mirror finish requires multi-stage buffing. Any flaw is visible, leading to a high rejection rate.
6.Chemical & Electrochemical Coloring
Altering the surface molecular structure. Note: Dimensional changes occur here.
6.1.Anodizing
Status: The Industry Mainstream.
Physics: Grows an oxide layer into and out of the aluminum surface. Doesn't chip like paint.
6.2.Electroplating
Application: Used for Chrome, Real Gold, or Silver finishes.
Aluminum Electroplating: The "Jewelry Grade" Finish
Electroplating covers the aluminum with a layer of other metal. Unlike Anodizing (which penetrates the metal), Plating sits on top. This adds thickness and creates a mirror-like shine that Anodizing cannot achieve.
Engineering Warning: Tolerance Plating adds 20-50 microns. You MUST design threads looser to accommodate this, or parts will not screw together.
The Foundation Layers
You don't see them, but they determine success.
Nickel Plating —— The "Binder"
Visual: Warm Silver. It has a slight yellowish/golden undertone compared to Chrome.
Function: This is the base layer for all other plating colors.
Stand-alone Finish: Used on some vintage-style sabers for a "lived-in" metallic look. It is not as hard as Chrome but offers excellent corrosion resistance.
Zinc Plating —— NOT for Aluminum Bodies
People generally DO NOT Zinc plate aluminum hilts. Zinc plating is ugly (bluish-grey/rainbow) and meant to stop Iron from rusting. Since Aluminum doesn't rust, Zinc plating it is pointless and looks cheap.
Usage: Only used for internal Steel Screws or Steel Springs.
The Chrome Family
The King of Durability.
Bright Chrome —— The "Mirror"
Visual: Cool Blue-White. Highly reflective, like a mirror.
Physics: Extremely hard (HV 800+). Resistant to scratches from rings or gloves.
Application: The classic "Sci-Fi" pristine look (e.g., Captain Phasma style armor).
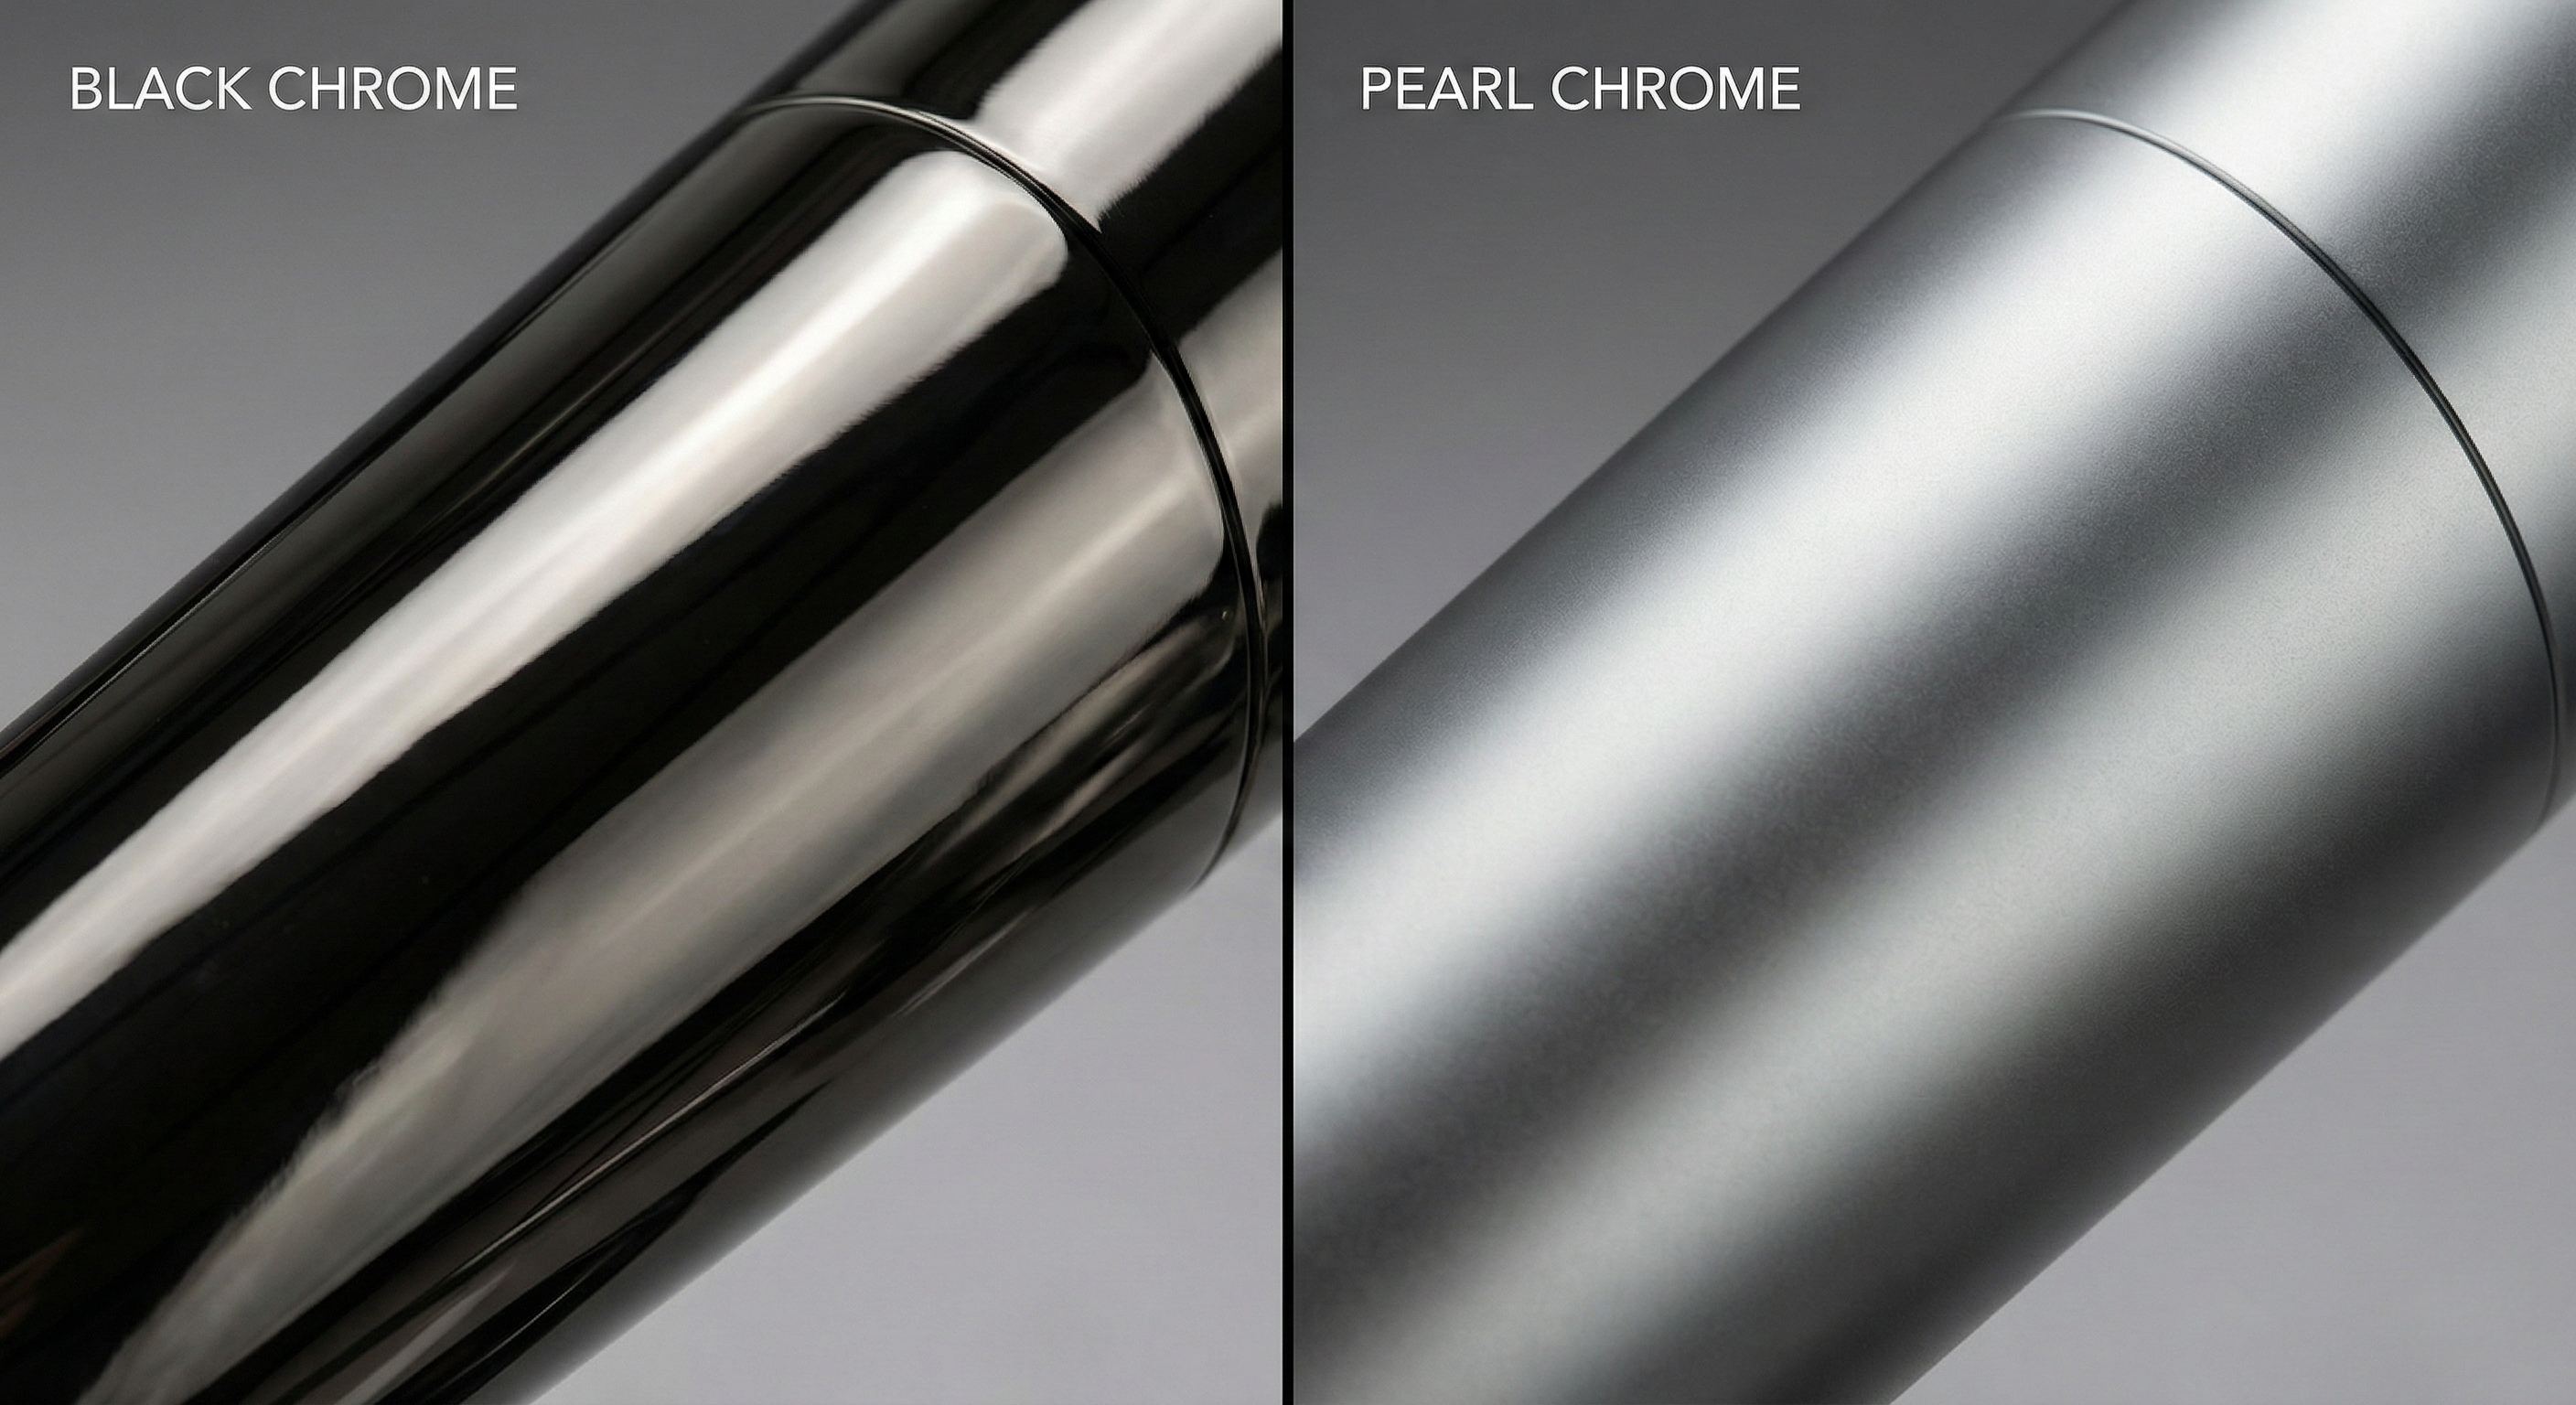
Black Chrome —— The "Sith" Finish
Visual: A deep, glossy Smoky Grey to Black. It looks like "Liquid Darkness."
Difference from Black Paint: Paint looks flat; Black Chrome looks metallic and translucent, preserving the metal feel.
Pearl Chrome / Satin Chrome
Visual: Matte Silver. Non-reflective, looks like high-end bathroom fixtures or Apple MacBook surfaces (but plated).
Tactile: Very smooth but not sticky. Good for grip.
The Gold Family
Luxury and Status.
Real Gold Plating - 18K / 24K
Visual: Rich, Deep Yellow. Unmistakable luxury.
Cost: Extremely High.
Durability: Gold is Soft. It wears off quickly with heavy handling (dueling).
Imitation Gold / Brass Plating
Visual: Yellow-Gold, but slightly lighter or "brassier" than real gold.
Cost: Low.
Cons: It will Tarnish (Oxidize) over time, turning dull or green if not clear-coated.
Rose Gold
Composition: Gold + Copper alloy plating.
Visual: Pinkish-Gold. Very trendy and elegant.
Durability: Better than 24K gold due to copper content, but still prone to fading over years.
Special & Exotic Plating
Ruthenium Plating
Visual: Jet Black / Dark Grey. Similar to Black Chrome but harder and more corrosion resistant. Used in high-end jewelry.
Cost: Very High.
Tin-Cobalt
Visual: Looks very similar to Chrome but slightly darker (Cool Grey).
Benefit: Excellent "Throwing Power" (it can plate into deep grooves/holes better than Chrome). Excellent for complex hilt designs.
Plating vs. PVD
(Must read for Gold/Rainbow colors)
The Problem with Electroplated Gold: It is soft and fades.
The Solution: PVD (Physical Vapor Deposition ) For Gold, Rose Gold, and Rainbow (Neo-Chrome) finishes,recommend PVD over Aluminum (after Nickel plating).

Titanium Nitride (TiN): Harder than steel, looks like Gold. Will not scratch off.
Rainbow / Oil Slick: Can ONLY be done via PVD, not electroplating.
6.3.Acid Etching
Process: Using acid to remove metal, creating relief patterns.
Engineering Critical: Tolerance Stack-up Chemical processes significantly impact dimensions. Electroplating adds thickness, while Etching removes material. Engineers must calculate "Process Allowance" in the CAD drawings. Failure to compensate results in: Parts not fitting, threads stripping, or components seizing (too tight).
7. Coating Applications
Applying an external layer over the metal.
7.1.Powder Coating
Durability: Baked plastic powder. Much tougher than liquid paint, resistant to chipping during combat.
7.2.Painting & UV
Application: Complex graphics (e.g., Cyberpunk lines).
Function: The UV Clear Coat is mandatory to seal the design and provide a smooth hand-feel.
7.3.Water Transfer / Hydro-dipping
Application: Wood grain, Camouflage, Carbon Fiber patterns on curved surfaces.
Limitation: The pattern is a thin ink film; it requires a thick clear coat to prevent wearing off.
8.Thermal & Laser Processing
Modern subtractive manufacturing using light energy.
8.1.Laser Engraving
Surface: Removes the anodized layer to reveal raw aluminum (White/Silver logos).
8.2.Deep Laser Etching
Texture: Burns deep into the metal to create grip textures or relief patterns without chemicals.
9.Post-Processing / Weathering
The Soul of the Replica. Turning a factory product into a veteran weapon.
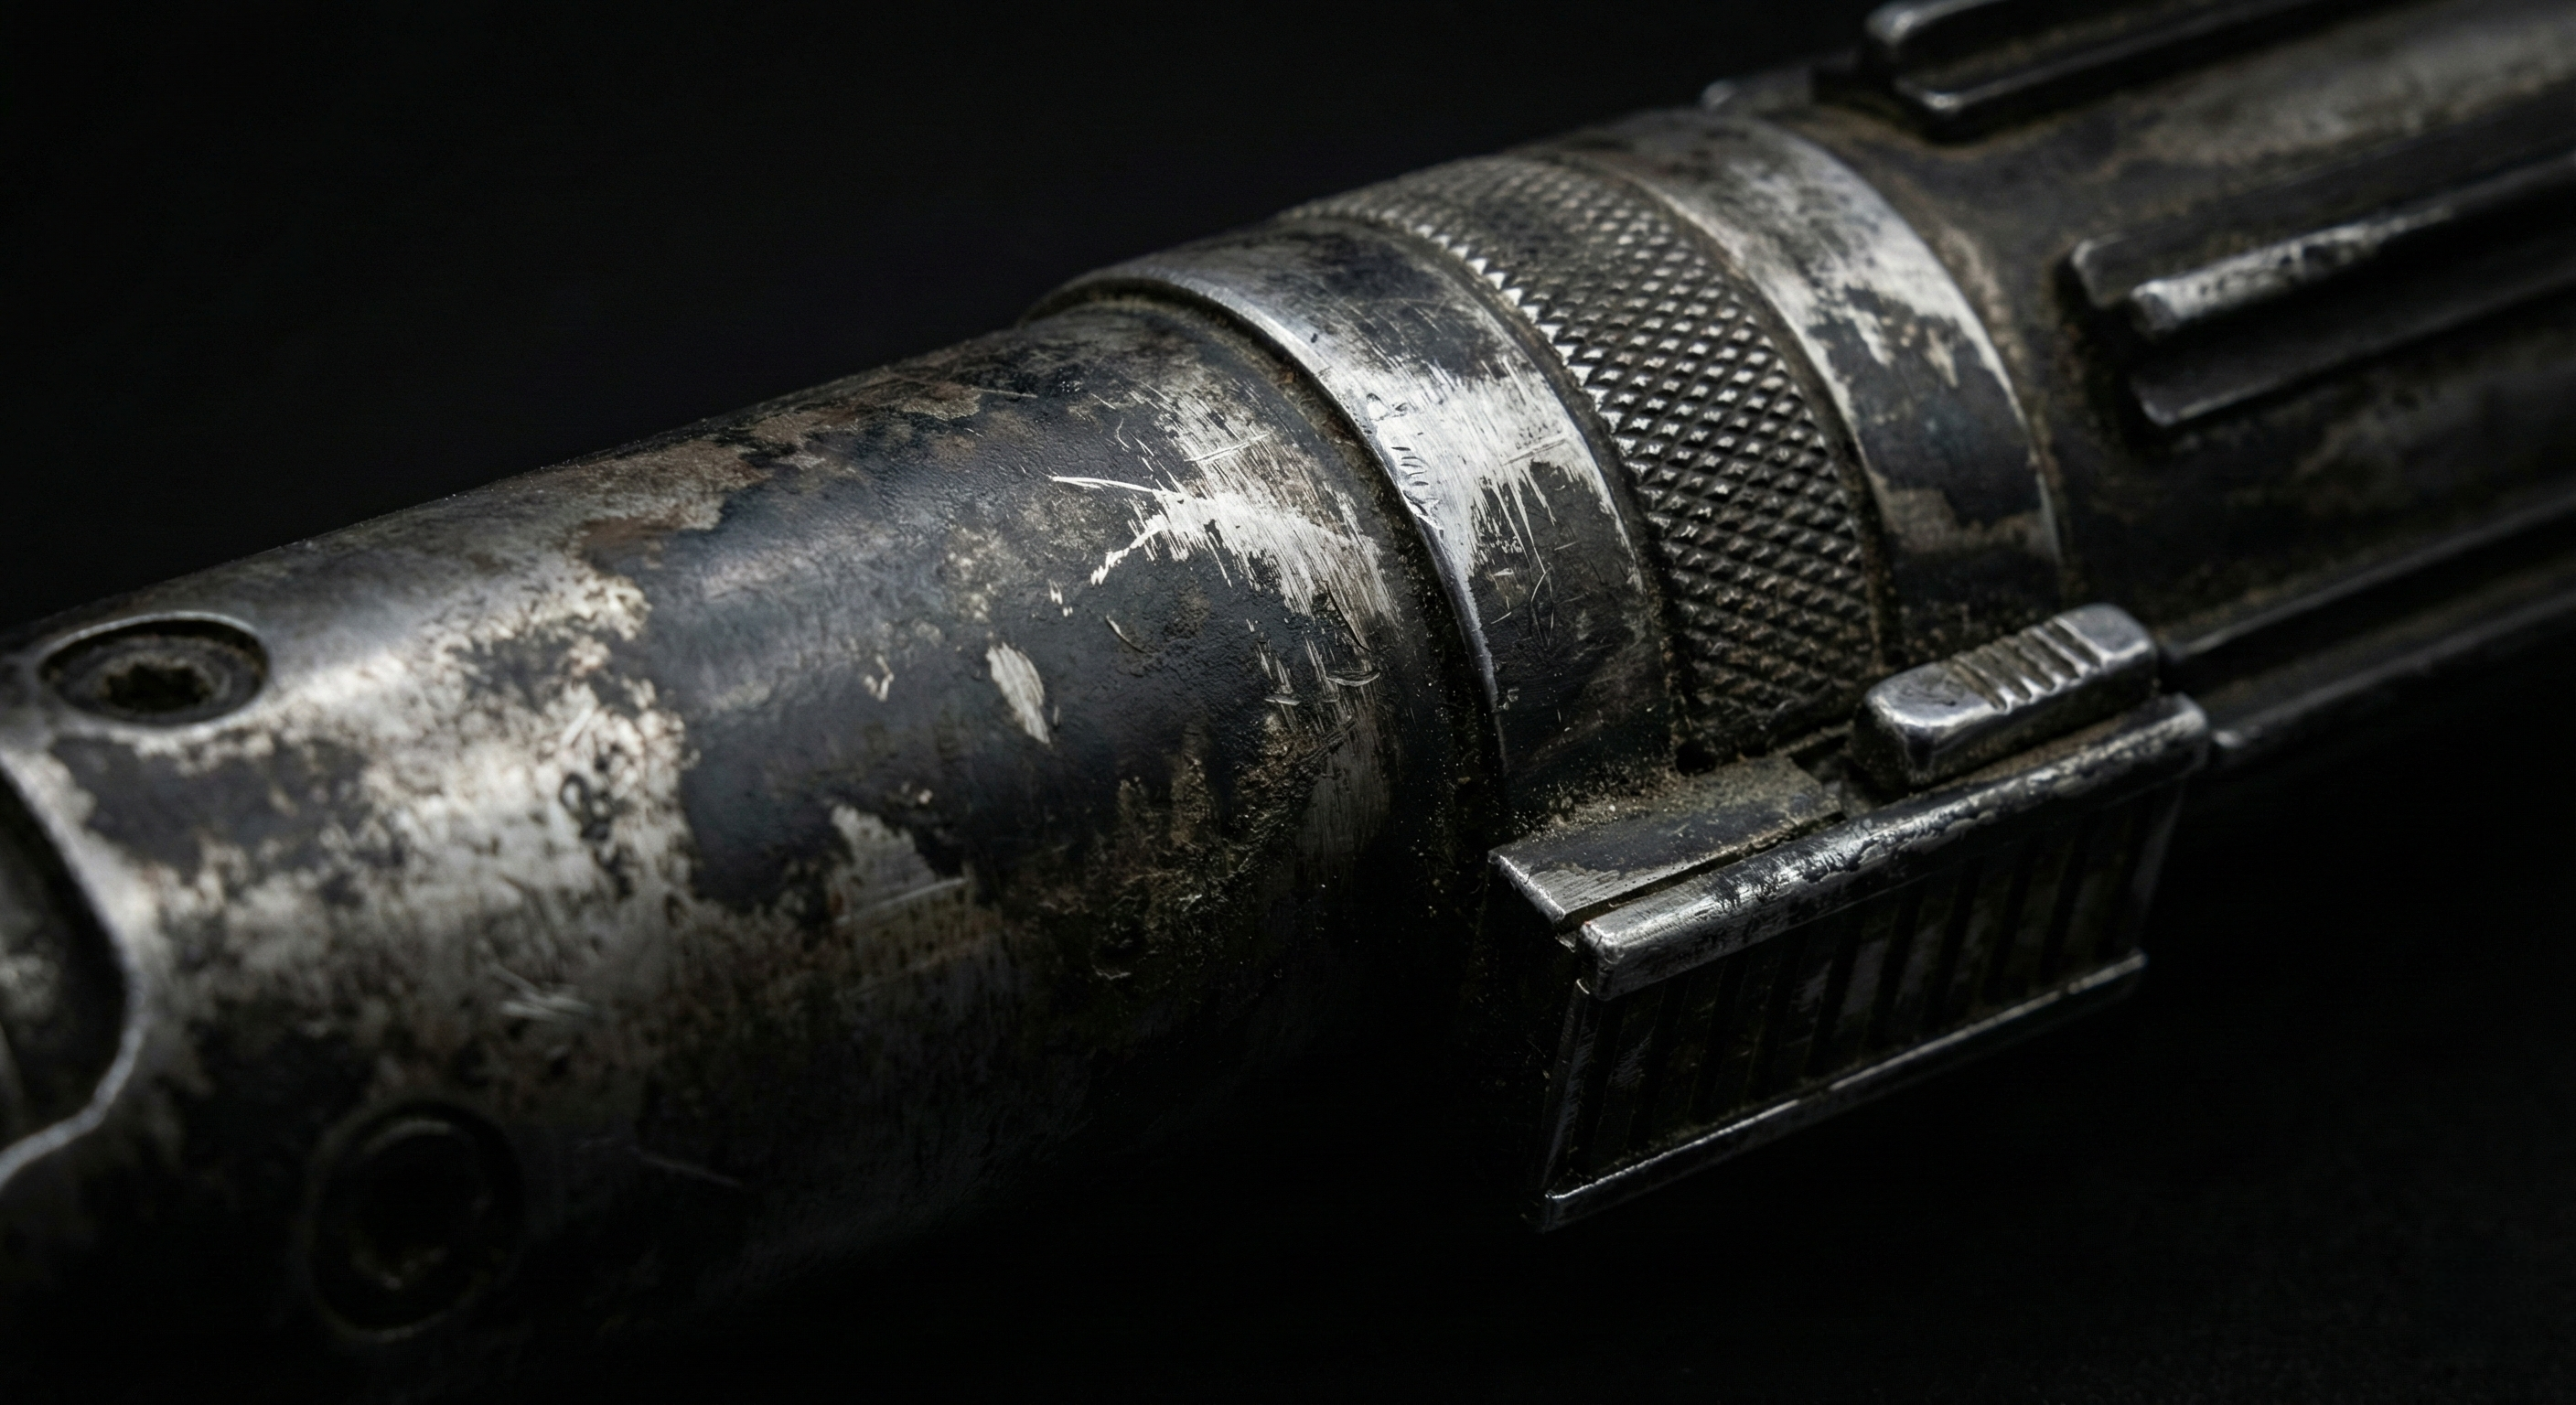
9.1.Physical Weathering
Technique: Using sandpaper, tumbling stones, or files to simulate battle damage and edge wear.
9.2.Chemical Weathering
Technique: Using Aluminum Black (Selenium Dioxide) to oxidize raw aluminum into a dark gray/black residue instantly.
Cost & Safety Warning:
Health Hazard: The chemicals are toxic and carcinogenic. Workers must wear full PPE (Protection).
High Cost: Manual application is slow, and strict safety protocols increase labor costs significantly.